Are you trying to figure out how to remove solder from circuit board for fixing a faulty component or salvage parts?
One of the most crucial skills every electronics hobbyist working with circuit boards must master is solder removal with safety and quality. When soldering, the old solder must be removed from the surface of the circuit board. You need to ensure that the circuit board remains intact and functional.
Practice makes perfect but it required proper skill and understanding theory behind it. Understanding solder properties will help to improve quality and also minimize the risk of damaging sensitive components on your circuit board.
In this post, I will explain to you how to remove the old solder circuit board. I also explain to you the best practices and various techniques to remove solder like a pro.
Table of Contents
How to Remove Solder from Circuit Board– Video Tutorial
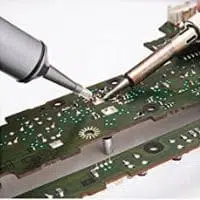
Removing solder from a circuit board heat the solder by using the soldering iron to the appropriate temperature until it until it starts to melt. Then Quickly press the button on the desoldering pump to create a vacuum, sucking up the molten solder into the pump. You can use desoldering wick in place of a solder sucker.
Solder removal can be done using a wire stripper, an iron, or an acid-based solution. The most common way to remove solder from a circuit board is by using an iron. This method can be time-consuming and tedious, so it’s best to use a wire stripper or acid-based solution for the job.
If you’re looking for some quick methods for removing solder from your circuit board, there are five ways you can use them:
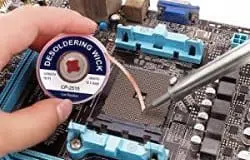
how to remove solder By Using Desoldering Braid

Desoldering braid is a thin wire with an adhesive material on one side and a flux on the other. The braid is usually wrapped around the soldered joint to be removed, then heated until it melts and removes the solder from the joint.
The solder wick is a very simple-to-use Wire Roll that is used in a wide range of desoldering applications. You can correct mistakes and remove electronic components like capacitors, relays, and many more. The Desoldering Braid is suitable for labs, home, and industrial applications to remove and correct errors on printed circuit boards.
If You are using the soldering braid for the first time, it is recommended to use a multi-point flux to assist in cleaning. In the next step, place the solder braid on the solder joint that needs to clean. Then use the solder tip of the soldering iron to heat with little pressure. Due to that heating, the solder melts and is sucked by the soldering wick.
After that, wait till the solder is absorbed, and with the help of a tweezer, remove the wick and solder from the surface. After cleaning the required surface, cut the used solder wick for subsequent next use caution that avoids direct touch to prevent burning.
how to remove solder By Solder Sucker

Soldersuckers use suction to remove solder from circuit boards. They are typically used for small-scale jobs like laboratory work or prototyping in electronics manufacturing facilities where space constraints prohibit more prominent tool use.
Solder suckers are used in a wide range of industrial and home applications. It is highly suitable for DIYers and hobbyists. It can be used to repair, Removes, and re-solder electronic components. It is also used to clean old and extra soldiers.
The solder sucker is very easy to use, just like the soldering braid. First, heat the solder surface and Position the pump’s nozzle with molten solder as closely as possible. The nozzle is heat-resistant plastic, so don’t worry about using it. After that, press the side button to activate the solder sucker to suck the molten solder.
Repeat until all extra solder is removed from the printed circuit board component surface. To find out about top-rated solder suckers, check my article >> 7 Best Solder Suckers for Electronics (2022).
how to remove solder by Heat Method
The Heat Method is a method of removing solder from printed circuit boards. The best way is to use a heat gun and some solder wick. The first step is to remove any excess solder with a solder sucker or desoldering pump tool found on online retailers such as Amazon. Then, the user will need to use the soldering iron on low heat to remove any traces of old solder and residue.
This method works best when no other nearby components, like capacitors and resistors, could be damaged by heat or the liquid used in the process.
Acetone solder remover chemical Method
The acetone method is the best way to remove solder with acetone. This method involves using a plastic syringe to suck up the solder and then a rag or paper towel to wipe it off the board.
Solder can be removed with other methods, but this method is more effective than other methods.
how to remove old solder by Compressed Air Methods
Use compressed air on the board before and after removing the solder; this will help loosen any residue left in the holes where the solder was removed.
how to remove old solder from circuit board By Tool Method
To remove solder from the surface, you need specialized tools and equipment. The best way to remove solder from the surface is by using the “Tool Method.” This method uses a mild acid solution to break down the oxide layer on the copper surfaces, which allows you to scrape off all solder traces with minimal damage to the surrounding areas.
In general, the steps that need to be followed for it are as follows:-
1) The first step in removing solder is to locate the solder joints on a circuit board. It can be done using a multimeter or looking for the physical connection points between two pieces of metal on the board.
2) Then, use an iron that has been heated up with solder-free flux on both sides of each joint until it melts away.
3) Use a wire stripper or knife to remove any excess plastic from the wires.
4) Finally, clean up any remaining residue with acetone or alcohol, and then
The process of removing solder from a circuit board is called wire stripping. It can be done with various tools, but desoldering braid and solder sucker is the most common.
Then, use a brush and scrubber tool to remove any remaining debris on the surface. After that, use an air gun and compressed air to blow away any remaining debris on the surface. Finally, use an alcohol wipe to clean off any residue left behind by water or soap.
But do know there are some other methods available helpful in doing so. Some people adapt to dry methods and some to wet ones. It is integral to know the best method suitable to the particular condition.
What is the Difference Between Wet and Dry Removal?
Wet removal is when the solder is removed by using a solvent. This process can be done using water, alcohol, acetone, or other chemicals.
Wet removal takes more time than dry removal because it requires a lot of patience to wait for the chemical to work its magic on removing the solder from your circuit board. Dry removal takes less time because you don’t have to wait for anything, and you only need to heat your soldering tool before scraping off excess solder.
Dry removal is when the solder is removed without using any solvent. The dry removal process requires heating the solder and then scraping it off with a metal object such as an X-acto knife or metal spatula.
4 Tips for Successfully Removing Solder from Circuit Boards:
Solder is a conductive material used in electronics and electrical engineering. It is usually used to join electronic components or connect electrical circuits’ wires.
The solder can be removed easily using a soldering iron. But, if you are not careful while removing the solder, you may damage some other components on your circuit board. So here are four tips for successfully removing solder from circuit boards without damaging them.
- Always use a proper soldering iron with a temperature control knob to remove the solder from the circuit board.
- Use flux paste instead of water to remove the solder from the circuit board.
- Use a small brush to clean out any remaining flux residue after removing all of the soldiers from the circuit board.
- After cleaning, use alcohol or acetone.
We hope you know how to remove the solder from the circuit board. Adapt the best method and be ready to get the outcomes of your choice!
How to Remove Solder from Circuit Board – FAQ
Q. How to solder copper pipe with water in it?
A. To solder copper pipes with water in them, remove any old solder from the joints. Then, use a soldering iron to heat the joint until it melts. Next, place the iron tip into the melted solder, slowly moving the iron around the joint while applying pressure. This should help create a strong bond between the copper and the solder.
Finally, if necessary, apply more heat to liquefy the solder fully.
Q. How to remove solder from copper pipe without heat?
A. The best way to remove solder from copper pipes is to use a soldering iron. However, if you do not want to use a soldering tool, you should try using a blow torch. If you do not have a blowtorch, you should heat the solder until it melts.
Then, you should pour some water into the melted solder, which will help separate the solder from the copper pipe.
Q. How do you remove hard solder?
A. Hard soldering is when you use too much solder. The problem is that the solder melts and sticks to everything when you heat the board. To solve this problem, you need to add flux to the board, making the solder stick better. Then, it would help if you cleaned the board using a wire brush. Finally, you need to apply some new solder.
Q. How To Remove Solder From Copper Pipe?
A. Use a heat gun and a pair of pliers to remove the solder. First, hold the heat gun near the joint to remove the solder. Next, turn on the heat gun and wait for the solder to melt. When the solder melts, grab the pliers and squeeze them together. This will make the solder fall off the copper pipe.
Related Read
What is Moisture Sensitivity Level? How MSL Chart Defined
